So you want to be able to keep multiple drafts of a document you and your team are working on without other people seeing it and when you've finally polished your policy manual (or whatever your document may be), post it for "everyone" to see?
Well, SharePoint can let you do that! See my blog posting on creating a document library.
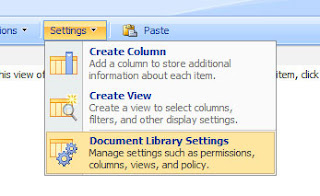
Once your library is created, you'll want to turn on your versioning settings within the library (if you didn't do it when you created the library). To do so, click Settings from the Library's toolbar and select Document Library Settings.
From the General Settings options, select Versioning Settings.
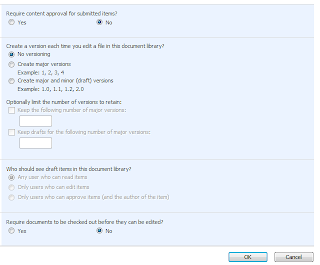
From this screen, you will set whether or not the document requires approval before being made available to "everyone" to view. (Everyone being whomever has permissions to view the document library).
Determine if you want major and minor versions and set the number of versions you need.
Who should be able to edit and see the documents that are in draft format?
Finally, check whether or not the document should be checked out for editing. To prevent other people from being to edit while you are editing, it is a good idea to require check out.
Once you've made your selections, click OK.
Well, SharePoint can let you do that! See my blog posting on creating a document library.
Once your library is created, you'll want to turn on your versioning settings within the library (if you didn't do it when you created the library). To do so, click Settings from the Library's toolbar and select Document Library Settings.

From the General Settings options, select Versioning Settings.
From this screen, you will set whether or not the document requires approval before being made available to "everyone" to view. (Everyone being whomever has permissions to view the document library).
Determine if you want major and minor versions and set the number of versions you need.
Who should be able to edit and see the documents that are in draft format?
Finally, check whether or not the document should be checked out for editing. To prevent other people from being to edit while you are editing, it is a good idea to require check out.
Once you've made your selections, click OK.
Comments
Post a Comment